Use of the Mortise Attachment
on MiniMax combination machines
Background on the MiniMax Mortiser
One of the components (or at least options) of a MiniMax five function combination machine or jointer-planer is the mortiser. It consists of a heavy cast unit that attaches to the side of the machine, so that a special "birds mouth" bit can be driven by a Wescott chuck at the end of the jointer/planer cutter. This gives me a 4.8 hp mortiser!
The work piece is firmly clamped to a moving table. The table manually moves left and right, in and out, with stops to limit the left and right movement of the table (the length of the mortise) and another stop to limit the depth of the cut. You might want to set the depth first... measure from the edge of the table where the workpiece will be aligned to the end of the bit, and set the stop that limits the depth of cut. Then I start with the four sides of the mortise drawn on the first workpiece. The height of the table that holds the work can be precisely adjusted with a crank, using the top/bottom lines you have drawn, aligned with the points of the bit. I set the left and right stops by aligning the table so the bit is next to the left-side mark, and then sliding the left stop in place and tightening. Same process for the right side stop. The birds mouth bit looks like a long router bit, and cuts with left-right movement, so it is gradually moved in (perhaps 1/8 to 1/16 inch per pass) while maintaining a left-right motion - it does not plunge. Different diameter bits are used for different width mortises. (See the notes on bits below, including end mills.)
It does a superb job, making mortises so easy and fast that I now use floating tenons, with mortises on both parts. Time to do the actual cut of a typical mortise is about 10 seconds. Setup time including selecting and putting the bit in the chuck, etc. is a few minutes, but a change in setup (e.g. for an apron not flush with a leg) is well under a minute. I had one project that required 252 large mortises in extremely hard ipe wood, but that took several hours.
This is a description of how I use the unit to do a typical table leg and apron.
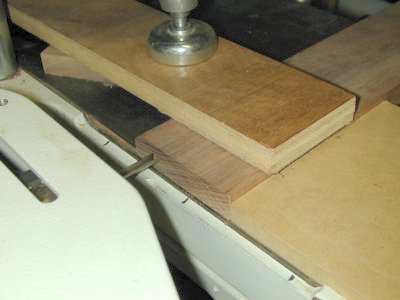
Preparation of the machine
I found it very convenient to make marks on the table at the left most position and the right-most position that the bit can reach - see little marks by the left and right red arrows in the picture. In addition, on my machine the stops that limit the left and right movement cannot go past the center, so I made an additional mark there, by the middle red arrow ... that center point will always be included in the mortise. Don't ask me how many times I have set up a mortise, then had to set it up again to include that point. Some of my friend's (newer) machines don't have the restriction in the middle.
Since the center of the table must be part of the mortise, the guide provided must be removed, since it attaches in the center of the table. I invested in a sophisticated replacement guide - a scrap of MDF and an old C-Clamp ... with the screw on the lower side, it easily attaches to the cast iron table, with the screw part avoiding the cast iron ribs. This guide stays in position to align both the aprons and legs in a typical use.
Breaking news... I have upgraded the jig to a scrap of hardwood rather than MDF! I marked a depth scale on the wood (¾, 1, 1¼, 1½) so that I don't need a ruler to set the depth of the mortise.
Cutting Mortises
Either the leg or apron can go first, here I started with the leg. The leg is mounted against the sophisticated shop built stop described above, and along the machined edge of the table. It is clamped firmly in place with the eccentric clamp provided. The left and right stops are adjusted to the distance the mortise is from the top of the leg and for the overall height of the mortise. A third stop is set to control the maximum depth of the mortise.
The actual cut consists of moving the table in until the bit just touches the wood, them moving the table left and right to cut the mortise. As you move left and right, apply a slight pressure to make the cut deeper, perhaps 1/8" at a time ... like a plunge router without a plunge bit, you will gradually work your way to the bottom of the mortise.
A CNC instructor had a rule to plunge or cut half the diameter of the CNC cutter, so for a ¼ inch cutter the depth of a sideways cut should be 1/8". CNC often use end mill cutters. Similar techniques work for birds mouth cutters. When the mortise is complete I often plunge full depth at each end of the mortise to be sure I have a smooth end.
The apron uses the same alignment - the shop-built guide still marks the distance from the top of the workpiece to the top of the mortise (the same for the leg and apron). The length of the mortise is the same. The table height is adjusted for the amount the aprons are set back from the front of the leg.
The eccentric clamp cannot reach the apron, so a second sophisticated shop-built jig is called into play. This one consists of a scrap of plywood, with some sandpaper glued to the underside to prevent slippage. A scrap cut-off from the apron holds the far end of the jig, with the eccentric clamp pushing down in the middle.
The floating tenon stock is cut in advance using the thickness planer to create stock the size of the mortising bits (usually whenever I have some scrap wood of the appropriate size). The edges can be quickly rounded on a sander, ideally leaving a small area on the top and bottom of the floating tenon for the glue and air to escape. On other pieces I round over the edges with a roundover bit or bead cutter on the shaper (I don't have a router table, but that would work, too). Note that with the router or shaper you need to use a fence, since you are cutting away the part a guide bearing would follow. Then I cut the individual tenons as needed, a couple inches at a time, off this prepared stock.
New machine alignment
When the mortiser is first attached to the side of the jointer/planer, it will seem too high. It can be raised and lowered with the screws it rests on at the bottom. Don't change it like I did. The normal position of the mortiser is fairly high on the mount, and if it is lowered, you may have trouble centering the mortise in thinner boards.
To check the alignment of the mortiser, I put the largest bit in the chuck, and raise the table until it almost touches the bit (separated by, perhaps, the thickness of a sheet of paper). Move the table back and forth, in and out, so this gap is constant. No special alignment procedures... the obvious screws are adjusted for left and right slope. I haven't had to perform the "slope away from the machine" alignments on any of the four machines I have helped set up.
Sources for bits
Birds Mouth bits
The bits distributed by MiniMax when I got my machine were fractional inch bits apparently made by Onsrud - but it appears that Onsrud has discontinued them.
A friend bought a MiniMax machine with mortiser, and his bits were metric - for example 7 mm rather than 1/4 inch, and had 4 points (flutes) rather than 2. I heard some were made by Clico, but I haven't found a way to by them.
These bits available in carbide tip, metric sizes, from Rangate. The regular price varies from $68.95 for 6 mm to $84.95 for 16 mm. I suggest you call them at 888-810-2522 since you cannot purchase directly from their web site, there are occasional special sales, and their default shipping can be expensive. I finally bought a 10 mm (3/8 inch) cutter from them, close to $100 with shipping, and wish I had not wasted my money.
I recently heard about ICS Cutting Tools but have not bought from them. Their cutters are $12 each, similar to the price from Onsrud back when MiniMax sold theirs, but there is a $5.50 handling fee on all orders, and a $5 service charge for orders under $35. If I had to buy today, they would be my vendor.
Southern tool makes 2 flute HSS mortising bits but only sells through dealers. Try Tool Man Shop where the 3/8" bit is available for $18.43, or Carbide Processors for $14.91 but "currently not available - check back later."
Theoretically there should not be a concern about metric vs. imperial sizes, since either thickness tenon stock can be easily created as needed. However, rather than discarding my 3/8 inch tenon stock to take advantage of my new 10mm carbide bit, I sharpened my heavily used 3/8" HSS cutter. The HSS bits are easily sharpened without impacting the cutting diameter, so I have been using my original cutters for over 12 years.
End Mills
Some people wonder why you couldn't use an end mill with a half inch shaft.
Depending on how the mortiser is mounted, most of the MiniMax machines require counterclockwise rotation (left twist), the opposite of traditional drills, mills, and cutters.
The end mill demo I saw was done by a well known woodworker as part of a vendor demo video. I believe he did not routinely use this equipment. The mortising action was to plunge multiple times, and only move sideways to clean out the mortise at the end. The result was not as clean, smooth, and precise as I routinely get with birds mouth bits.
Denis Kenzior, one of the respected woodworkers on the MiniMax forum likes using end mills for mortises 3/8" or smaller, and believes that he gets results at least as good as with the birds mouth bits. He makes shallow sideways cuts, just as I do with the birds mouth bits.
Beware of the too-long bit. One user was looking for a ¼ inch diameter birds mouth bit, 4-5 inches long, so he could cut through tenons with a single setup. I hate to think of the possible deflection on a 5 inch long 1/4 inch diameter spinning shaft cutting sideways.
Mortiser Cart (Trolley)
The mortiser is heavy, sometimes gets in the way, and fortunately is easy to remove. I had a rolling bench that fit over the mortiser table, so I built a couple braces under the table that "catch" the mortiser. Loosen the two connecting bolts, roll the cart over the mortiser, then crank the height wheel as if you were lowering the mortiser table. It will lift the mortiser off the mounting bolts, and away you go. My "Elite" mortiser is practically 20 inches wide, larger than some of the lighter/smaller mortisers on the "Smart" and "Lab" machines, so be sure to check your dimensions before you build it.
The orange thing on the bottom of this cart is the shaper hood from my combo machine.
Tim Rowledge built a cart/trolley for his CU300 mortiser, based on a commercially available cart, and has a web page describing how he did it. No problem with his approach, but I already had a suitable rolling bench. Be sure you check the dimensions of your mortiser before building either unit.
I need your help. If you have additions or corrections to information on this or other MiniMax products, please send it to me by eMail.